In today’s tutorial I will show you how to transform fashion photography into abstract female photo illustration using Adobe Photoshop CS5. Layered PSD file included. Let’s get started!
Final Image Preview
Create a new document (Ctrl+N) in Adobe Photoshop CS5 with the size 1280px by 1024px (RGB color mode) at a resolution of 72 pixels/inch. Use the Paint Bucket Tool (G) to fill with #011423 color the new background layer.
Find a stock photo with a model represented on it, I used this photo from deviantart. I would like to thank the author of this photo, or if you prefer, you can substitute similar image of your own.
Remove the background using your favorite tools like Pen Tool (P), Magic Wand Tool (W), Magnetic Lasso (L) or even a simple Filter>Extract and insert it on a new layer in our main document.
Next select the Ellipse tool (U) to represent a small ellipse of the color #470E2E. Place the layer under the girl’s one.
Make sure the ellipse’s layer is active and click on the bottom part of the
Layers panel on
Add layer mask icon. Select the
Soft Round brush of
black color from
Brush Tool (B).
Use this brush to paint in the mask to hide the ellipse’s edges, exactly the way shown below:
Make a copy of this last made layer and select for the copy the Soft Round brush mentioned above. Add layer mask and paint in the mask to hide the ellipse’s edges, exactly the way shown below:
Create a new layer and use on it the
Elliptical Marquee Tool (M) to represent a elliptical selection inside of which we’ll paint with
Soft Round brush (click several times on the central part of the selection), choosing the color
#EFDB84 (
Flow - 50%)
Let’s create a
clipping mask. Hold down
Alt (Windows) or
Option (Mac OS) and click between layers (on the
Layers panel).
We’ve got the next result:
Change the
Blending mode for this layer to
Linear Light.
On the next
new layer we’ll select the
Soft Round brush.
Use this brush to make darker the girl’s hair, using the color
#0E0C0C.
Let’s create a
clipping mask. Hold down
Alt (Windows) or
Option (Mac OS) and click between layers (on the
Layers panel).
We’ve got the next result:
Create a new layer and choose the
Soft Round brush.
Use this brush to represent this time three spots:
Let’s create a
clipping mask. Hold down
Alt (Windows) or
Option (Mac OS) and click between layers (on the
Layers panel).
We’ve got the next result:
Change the
Blending mode for this layer to
Hard Light.
On the next new layer we’ll make darker again the edge of the girl’s hair, using the Soft Round brush of black color in this case.
Let’s create a
clipping mask. Hold down
Alt (Windows) or
Option (Mac OS) and click between layers (on the
Layers panel).
We’ve got the next result:
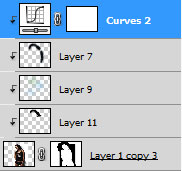
Select
Create new fill or adjustment layer from bottom part of the
Layers panel and click to
Curves to adjust the curve shape as shown to make a little color corrections.
We’ve got the next effect:
Let’s create a
clipping mask. Hold down
Alt (Windows) or
Option (Mac OS) and click between layers (on the
Layers panel).
We’ve got the next result:
Select once again
Create new fill or adjustment layer from bottom part of the
Layers panel and click to
Curves to adjust the curve shape as shown to make a little color corrections.
We’ve got the next effect:
Let’s create a
clipping mask. Hold down
Alt (Windows) or
Option (Mac OS) and click between layers (on the
Layers panel).
We’ve got the next result:
Create a new layer and select the
Soft Round brush to paint the girl’s legs with the color
#001426.
Create one more
new layer and use here the
Paint Bucket Tool (G) to fill it with the color
#011423.
Change the
Blending mode for this layer to
Color Dodge.
Next select again the
Ellipse Tool (U) to draw a small ellipse:
Make sure the ellipse’s layer is active and click on the bottom part of the
Layers panel on
Add layer mask icon. Select the
Soft Round brush of
black color (Opacity 10%).
Use this brush to paint in the mask to hide the ellipse the same way as on the picture below:
Make a copy of the last made layer and select
Free Transform (Ctrl+T) command to make the copy smaller and place it the same way demonstrated next picture.
Represent another ellipse.
Make a copy of the last made layer and choose the
Free Transform (Ctrl+T) command to scale the copy and to place it the way from below:
Create a new layer and choose the
Soft Round brush.
Use this brush to paint those two ellipses with the color
#78002A (Opacity 50%).
Change the
Blending mode for this layer to
Color Dodge.
Next we’ll use the
Ellipse Tool (U) to represent another ellipse:
Make sure the ellipse’s layer is active and click on the bottom part of the
Layers panel on
Add layer mask icon. Choose the
Soft Round brush of
black color (Opacity 30%).
Use this brush to paint in the mask to hide the inside part of the ellipse.
Take the
Ellipse Tool (U) again and draw one more ellipse:
Make sure the ellipse’s layer is active and click on the bottom part of the
Layers panel on
Add layer mask icon. Select the
Soft Round brush of
black color (Opacity 30%):
Use this brush to paint in the mask to hide the inside zone of the ellipse.
Next we’ll apply again the
Ellipse Tool (U) to represent more ellipses, the same way we did before (insert the mask and hide their inside zones using
Soft Round brush).
Represent another ellipse.
Make a copy of the last made layer and choose the
Free Transform (Ctrl+T) command to place the copy as on the next demonstrated picture:
Add a new ellipse using
Ellipse Tool (U).
Click on
Add a layer style icon from bottom part of the
Layers panel and select
Drop Shadow.
We’ve got the next effect:
Make a copy of the last represented layer and select the
Free Transform (Ctrl+T) command to change copy’s sizes and its placement.
Add layer mask for the copied layer and hide its inside part, applying the
Soft Round brush.
Next we’ll continue representing the ellipses, applying the
Ellipse Tool (U) and hide them smoothly with the
Soft Round brush the same way we did with the previous ellipses:
Click on
Add a layer style icon from bottom part of the
Layers panel and select
Drop Shadow.
We’ve go the next result:
Make five copies of the last made layer with the ellipse on it and choose the same Free Transform (Ctrl+T) command to change the copies’ sizes, placing them as it is demonstrated next picture:
Next we have to rasterize the ellipse’s layer, the pointer indicates on it:
… and select for the rasterized layer next option
Filter>Blur>Gaussian blur
We’ve got the next result:
Choose the Free Transform (Ctrl+T) command to move the ellipse’s layer placement the same way it is shown on the next picture:
Make a copy of the rasterized layer containing the ellipse and choose the Free Transform (Ctrl+T) command to make a little smaller the copy, changing also the copy’s color on the white one.
Set
Fill to
65% for this layer and change the
Blending mode to
Hard mix.
Continue representing the ellipses, applying the
Ellipse Tool (U).
Make sure the ellipse’s layer is active and click on the bottom part of the
Layers panel on
Add layer mask icon. Select the
Soft Round brush of
black color (Opacity 30%):
Use this brush to paint in the mask to hide the ellipse content to get the same effect as the next one:
Continue representing the next ellipse, applying the same
Ellipse Tool (U).
Add layer mask and choose the
Soft Round brush of
black color (Opacity 30%):
Paint in the mask to hide the ellipse content, getting the same effect as below:
This way we have to represent one more ellipse:
Now we have to insert the
layer mask on the layer the same way we’ve already described above and hide the ellipse content with the
Soft Round brush of
black color (Opacity 30%).
Create a new layer and choose the
Soft Round brush to get a highlight of
blue color (
Opacity 10%).
Create a new layer and use the mentioned above brush to represent a highlight of yellow color (Opacity 10%).
Create the next
new layer, applying here the
Soft Round brush of
white color (Opacity 20%) to add the last highlight.
Select
Create new fill or adjustment layer from bottom part of the
Layers panel and click to
Curves to adjust the curve shape as shown to make a little color corrections.
We’ve got the next effect:
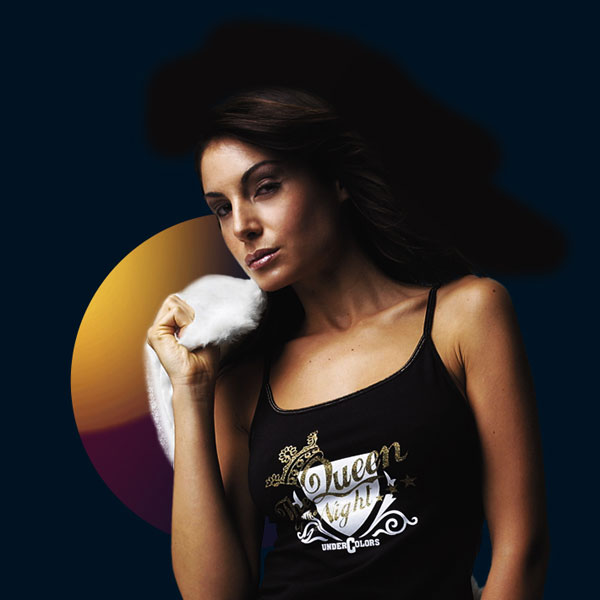
The final picture!
www.adobetutorialz.com