How To Install Windows 7 Using USB Drive
Microsoft had recently released a utility that allowed you to make a USB memory stick to install Windows 7 on computer’s that did not have a DVD drive. However Rafael Rivera of the “Within Windows” blog pointed out that the tool contained some GPL v2 licenced code and Microsoft have now quickly removed it from their web site. UPDATE: Microsoft has admitted that they violated the GPL v2 licence and have now released the tool under open source. In any case the instructions below show you how to build a much better bootable USB install memory stick that allows you to install ANY version of Windows 7.

If you have bought multiple version of Windows 7 and compared the DVD’s you might have noticed that they are the same with the exception of one file (ei.cfg). This one file tells Windows what version to automatically install during the install process. Because all the DVD’s are essentially the same you can use any Windows 7 DVD to perform a version upgrade of Windows 7 using the “Upgrade Anytime” option.
Now to make this bootable universal Windows 7 install USB memory stick you will need at least one Windows 7 DVD 32bit or 64bit depending on what version you want to install and a blank 4gb USB memory stick. Note you will need to create a separate 32 or 64bit USB memory stick of Windows 7 but it will let you install the different SKU’s.
Step 1. Insert the Windows 7 DVD into your computer and the USB memory stick into your computer
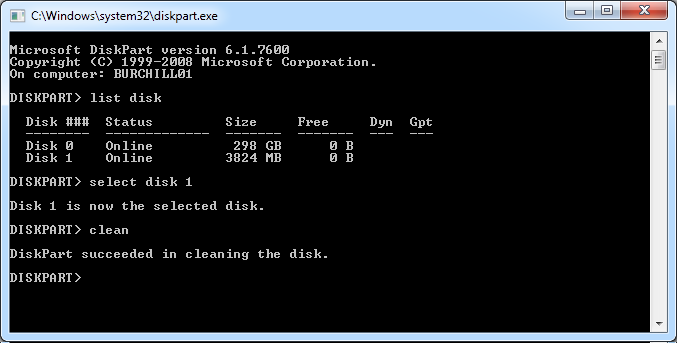
Step 2. Open an “Command Prompt” and run “DISKPART”.

Step 3. Type “LIST DISK” and take note what the disk number is of the USB memory stick. This will be the same size as the USB memory stick (eg. 3824 MB = 4 GB).

Step 4. Then type “SELECT DISK X” where X is the disk number of the USB memory stick.

Step 5. Type “CLEAN”. Warning – This will wipe all data from the USB memory stick.
Step 6. Type “CREATE PARTITION PRIMARY”

Step 7. Type “SELECT PARTITION 1”

Step 8. Type “ACTIVE”

Step 9. Type “FORMAT FS=FAT32” (and wait about 5 minutes depending on the size and speed of the USB memory stick)

Step 10. Type “ASSIGN”.

You will notice the auto play window now appears. Take note of the drive letter (e.g. F:\ ) and close this window.

Step 12. Back at the command prompt type “xcopy d:*.* /s/e/f F:” where D: is the drive letter of you DVD and F: is the drive letter of your USB Memory stick.


Step 13. Once the xcopy is finished run “del F:\sources\ei.cfg” from the command prompt and you Windows 7 Bootable USB memory stick is ready to go. Doing this step is what makes the USB memory stick allow you to install any version of Windows 7 as it no longer has a default version configured.

You can now either boot from the USB memory stick or just run setup.exe from the drive to start the install process. Either way you will now prompted for the version of Windows 7 you want to install.

Warning: This procedure will allow you to install a copy of Windows 7 that you are not licenced to have. Therefore you need to be very careful to only select a version that you have a licence key for as you will not be able activate Windows without a key that exactly matches the version you have installed.
Source : Windows7Center


